By the BLOOM Engineering Team
Pulling an extruder screw out of the barrel sounds simple until the screw refuses to move. Then it becomes the job that damages a precision part, eats a day of downtime, or sends people to the hospital with burns. As a factory that makes screws and barrels, we see the results of bad removals constantly — screws gouged by pry bars, barrels scored by steel tools, flights bent by a fork truck. Almost all of it is avoidable with the right sequence and a few rules.
This guide walks through how to remove an extruder screw from the barrel the way we do it and the way we tell customers to: when to pull the screw, how to prepare, the step-by-step removal, and — most importantly — how to free a screw that is stuck or seized without wrecking it. Industry maintenance experts are clear that improper removal can damage both the screw and the barrel, so the goal here is removal that protects two of your most expensive components.
1. Why Removing an Extruder Screw Correctly Matters
An extruder screw and barrel are precision parts. The screw is straight to within a few thousandths of an inch and finished to tight tolerances; the barrel bore is matched to it. Removal is the moment those tolerances are most at risk — because a stuck screw tempts people into force, and force is what bends flights, scores bores, and ruins the very parts they are trying to service.
The maintenance literature is blunt about it: removing the screw from the barrel is challenging, and improper removal can damage both components (Plastics Technology: installing, removing and cleaning extrusion screws). We have seen a brand-new screw ruined during installation because a crew pushed it in with a fork truck instead of stopping to find out why it would not seat. The same impulse — apply more force — is what damages screws during removal.
The cost of getting it wrong is not just the part. It is the downtime while you source a replacement, the scrap from running a damaged screw, and the safety risk of manhandling a hot, heavy component. Doing the removal correctly is faster and cheaper than doing it forcefully and replacing what you break. The rest of this guide is how to do it correctly.
2. When to Remove an Extruder Screw from the Barrel
Knowing when to pull the screw is half the battle — many problems are caught by a screw that comes out on schedule rather than one that is forced out in an emergency. The four situations that call for removal:
Regular preventive maintenance and wear inspection. The screw should be removed periodically to measure its outside diameter, check straightness, and inspect for wear. Industry guidance recommends removing and inspecting the screw at least once a year, or whenever processing performance changes (Plastics Technology: installing, removing and cleaning extrusion screws). Scheduled removal turns a potential emergency into planned maintenance.
Material or color changeover and deep cleaning. When switching to a very different material or color — especially a difficult color change — pulling the screw allows direct cleaning of surfaces that purging alone cannot fully reach. For smaller machines this is often faster than extended purging.
Troubleshooting a problem. When you have unexplained jamming, degradation, black specks, or abnormal output, pulling the screw lets you see what is happening inside — buildup, wear, or damage that no amount of process adjustment will reveal.
Replacing the screw or barrel. Obviously, replacing either part requires removing the screw.
| Trigger to remove | Why | What to check while it’s out |
|---|---|---|
| Annual / scheduled PM | Catch wear before failure | OD, straightness, flight wear |
| Material/color changeover | Direct cleaning access | Surface buildup, cleanliness |
| Troubleshooting | See the actual cause | Buildup, degradation, damage |
| Screw/barrel replacement | Required for the swap | Both parts’ condition |
A screw that is pulled on schedule comes out far more easily than one left until it seizes — which is the central theme of the stuck-screw section below.
3. Preparation: Purge, Heat, and Safety Before Removing the Screw
Most of the difficulty (and danger) of screw removal is decided before you touch a tool. Good preparation makes the screw slide out; poor preparation makes it seize and makes the job dangerous.
Purge the material out first. Run the machine to push out as much resin as possible, ideally with a commercial purging compound. Purging before pulling greatly increases the efficiency of the screw-pull, because residual material is the main thing that “glues” a screw into the barrel as it cools (Plastics Technology: purging and PM tips). A barrel full of cooled, solidified material is the single most common reason a screw will not move.
Keep the barrel hot — do not let it cool. This is the most important removal tip we give, and it is counterintuitive to people who think “let it cool down to be safe.” A screw is far easier to remove while the barrel and the residual material are still hot and soft. If you let everything cool to room temperature, residual material solidifies and grips the screw, and the thermal fit tightens. Pull the screw while the barrel is still at or near processing temperature (with appropriate heat protection) — the warm material stays soft and the screw backs out far more easily.
Safety first — this is a hot, heavy job. Removal involves three serious hazards: burns (the barrel and screw are at processing temperature, often 200°C+), heavy lifting (screws are heavy and, for large machines, require a hoist or extractor), and mechanical injury. Before anything:
- Stop the machine and isolate its energy (lock out / tag out) so it cannot start.
- Wear high-heat gloves and safety glasses.
- Plan the lift — for anything but a small screw, have the hoist, crane, or screw extractor ready, and support long screws so they cannot bend or fall.
Disassemble the front end. Remove the die, head, adapter, or nozzle to clear the path for the screw, and disconnect the screw-cooling lines if fitted. Then disconnect the coupling or gearbox connection at the screw shank.
With the material purged, the barrel hot, the machine locked out, and the front end clear, you are ready to pull — and the screw is in its most cooperative state.
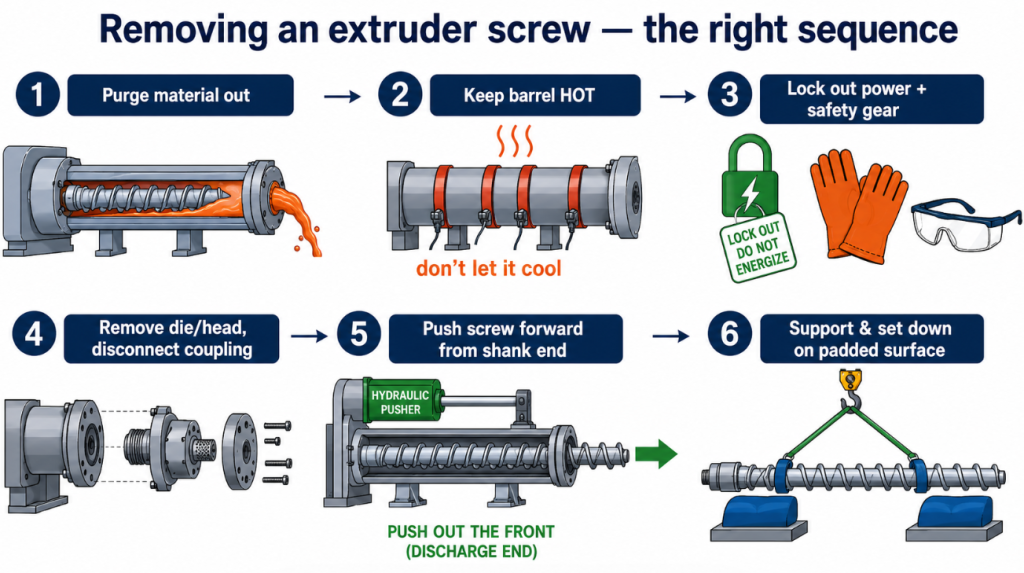
4. How to Remove an Extruder Screw from the Barrel: Step by Step
With preparation done, the removal itself follows a consistent sequence. (Larger machines and twin-screw extruders need more equipment and care, but the logic is the same.)
Step 1 — Confirm the machine is purged, hot, and locked out. Material pushed out, barrel still warm, energy isolated, front end disassembled, cooling lines off.
Step 2 — Mark alignment positions. Before disconnecting, mark the screw and coupling orientation so reassembly goes back the same way. Recording the disassembly sequence saves confusion and mistakes on reassembly.
Step 3 — Disconnect the screw from the drive. Unbolt the coupling or gearbox connection at the screw shank.
Step 4 — Push the screw forward from the shank end (the right direction). Screws are normally pushed out the front (discharge end), not pulled from the front. Using the machine’s screw extractor mechanism or a hydraulic pushing device at the shank end, push the screw forward so that several turns emerge at the discharge end. On many machines a built-in screw-pushing/extractor mechanism is designed for exactly this.
Step 5 — Support and continue pushing. As the screw emerges, support its weight — especially on long screws, which can bend under their own weight or be damaged if they drop. Continue pushing/extracting until the screw is free, transferring it to a hoist or padded support as more of it comes out.
Step 6 — Set the screw down safely. Place it on a clean, padded surface — not bare concrete or a steel bench where the flights can be nicked. The screw is a precision part; protect its surface the moment it is out.
If the screw moves smoothly through this sequence, you are done and can move to inspection (section 7). If it stops moving — which is common — go to the stuck-screw section next.
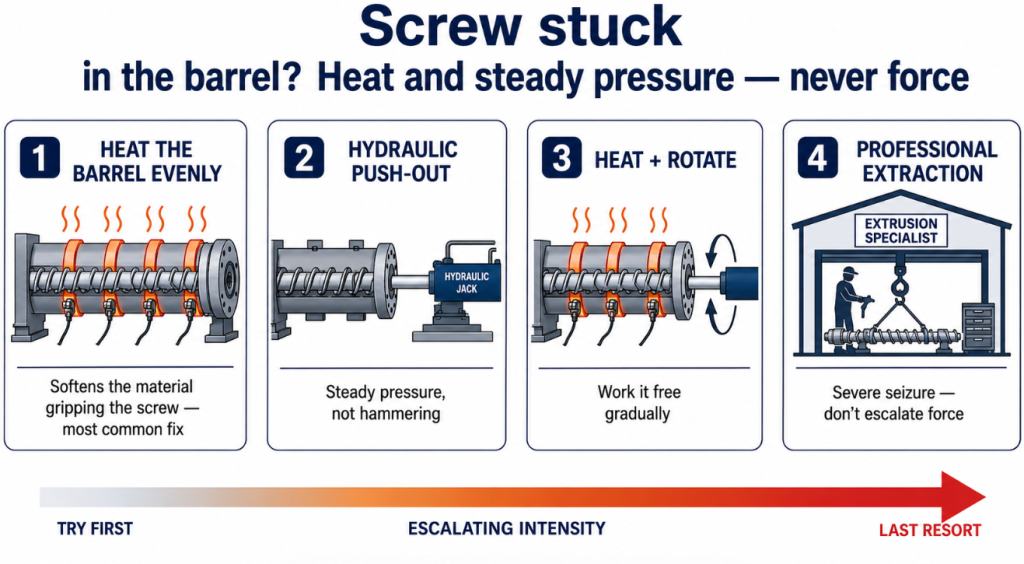
5. How to Free a Stuck or Seized Extruder Screw
This is the heart of the problem, and the situation our customers ask about most: the screw will not come out. A stuck or seized screw is where good technique matters most, because it is exactly when people reach for force and do damage. Here is how to free it without wrecking the parts.
First, understand why it is stuck. The two common causes are (1) cooled, solidified material gripping the screw — the most frequent — and (2) a tight thermal/mechanical fit, sometimes worsened by wear, scale, or degraded material baked onto the surfaces. The fix depends on the cause, but heat addresses both.
Method 1 — Heat the barrel evenly with its own heaters. Turn the barrel’s band heaters back on and bring it up to (or above) processing temperature. Even heating does two things: it re-softens the solidified material that is gripping the screw, and the thermal expansion can change the fit. This is the single most effective method for a screw stuck by cooled material — and the reason we stress pulling the screw while still hot in the first place. Important: heat the barrel evenly with its own heaters — never apply a torch to the screw (see the warning in section 6).
Method 2 — Push it out hydraulically from the shank end. Use a hydraulic or mechanical pushing device at the shank end to push the screw forward. A seized screw may move only an inch or two at a time, and you may need progressively more force — the maintenance literature describes exactly this, a stuck screw moving a couple of inches, then needing a larger hydraulic jack to continue (Plastics Technology: installing, removing and cleaning extrusion screws). Use steady hydraulic pressure, not hammering.
Method 3 — Heat and rotate, backing it out gradually. With the barrel hot, slowly rotating the screw while applying pushing force can work it free gradually, breaking the grip of softened material as it turns.
Method 4 — For a severely seized screw, get professional help. If the screw is badly seized — baked-on degraded material, corrosion, or a screw that has not been pulled in years — escalating force risks destroying both parts. At that point, a screw/barrel specialist with proper extraction equipment (or sending the assembly out) is cheaper than ruining the components. There is no shame in this; a severely seized 38CrMoAlA screw in a worn barrel can be genuinely stuck.
| Stuck-screw method | How | Best for |
|---|---|---|
| Even barrel heating | Band heaters to processing temp | Cooled/solidified material (most common) |
| Hydraulic push-out | Steady pressure at shank end | Tight fit; combine with heat |
| Heat + rotate | Rotate while pushing, barrel hot | Material grip, gradual freeing |
| Professional extraction | Specialist equipment / send out | Severe seizure, baked-on or corroded |
The thread through all of these: heat softens the grip, steady pressure moves the screw, and force-as-a-first-resort is what does damage. A stuck screw is a heat-and-patience problem, not a bigger-hammer problem.
6. What Not to Do When Removing an Extruder Screw
Most screw and barrel damage during removal comes from a short list of tempting mistakes. Avoiding these protects parts worth far more than the time saved by rushing.
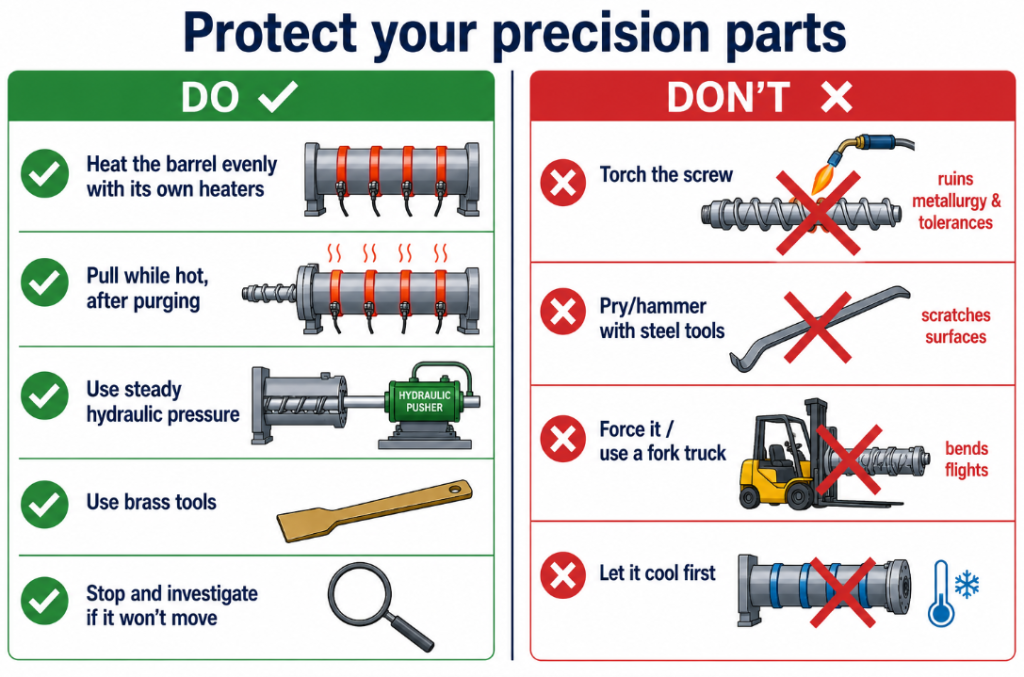
Never use an acetylene torch on the screw. This is the biggest and most destructive mistake. Using a torch to heat or burn material off the screw destroys the metallurgical properties of the base metal and ruins the closely machined tolerances — the screw is straight and sized to thousandths of an inch, and localized torch heat warps and softens it permanently (Plastics Technology: how to clean screws nondestructively). Heating the barrel evenly with its own band heaters (section 5) is correct; taking a torch to the screw is not. The distinction matters: controlled, even barrel heat is your friend; localized flame on the precision screw is permanent damage.
Never pry or hammer with steel tools. Steel pry bars, scrapers, and screwdrivers gouge and scratch the screw flights and barrel bore — and those scratches become permanent flow disruptions, dead spots, and gel/black-speck sources later. Use brass tools, not steel, for any scraping (Plastics Technology: how to clean screws nondestructively). Steel-on-screw is one of the most common avoidable damages we see.
Never use excessive or impact force. Excessive force should never be used to install or remove a screw. If a screw will not move with steady hydraulic pressure and heat, the answer is more heat and patience — or professional help — not impact, leverage, or a fork truck. Force bends flights and seats damage.
Don’t let it cool first. Covered above, but it bears repeating as a “don’t”: letting the barrel cool to room temperature before pulling makes the job harder, not safer. Pull it hot (with heat protection).
Don’t drop or bang the screw after removal. Once out, the screw’s precision surface is exposed. Setting it on bare concrete, leaning it against steel, or letting it bang around nicks the flights. Protect it immediately.
7. After Removal: Inspecting and Cleaning the Extruder Screw
The moment the screw is out is the best opportunity you get to assess your machine’s health — don’t waste it by tossing the screw aside.
Inspect for wear immediately. Measure the screw’s outside diameter at the flights and check straightness against the original specification. This is the direct measurement of screw wear, and it tells you whether the screw is still in spec or heading for replacement. Pulling the screw is the only way to get this data — see our screw and barrel wear analysis for how to interpret the measurements and our guide on how often to replace the screw.
Clean it properly — with brass, not steel. With the screw out, clean it while it is still warm using brass tools and a brass wire brush, never steel, then polish with copper gauze and a soft rag. Our step-by-step screw cleaning playbook and safe barrel cleaning guide cover the method in detail.
Inspect the coating and decide on action. If the screw shows wear through its coating, this is the moment to decide on re-coating, hardfacing, or replacement — see our coating and surface treatment guide and screw repair guide. Also inspect the barrel bore while you have access; if it is worn, see our guide on barrel relining and replacement signs.
Store it protected. If the screw is going back in later, store it supported (so it cannot bend) and protected from impacts and corrosion.
8. Reassembling: Installing the Extruder Screw Back in the Barrel
Reinstallation is removal in reverse, with the same core rule: no excessive force.
Use your alignment marks. Reassemble using the orientation marks and sequence you recorded during removal. This is why marking and recording during disassembly matters.
Insert gently — never force. The screw should slide in with the barrel hot. If it will not seat the last bit, stop and find out why — do not push it in with a jack or fork truck. The cautionary tale from industry experience is exactly this: a screw that would not seat the last few inches was forced in rather than inspected, storing up a problem. If it does not go, there is a reason — find it.
Reconnect and check alignment. Reconnect the coupling/gearbox and the cooling lines. For large or long machines, barrel alignment should be checked whenever a barrel is removed or changed, as misalignment causes side forces and accelerated wear (Plastics Technology: troubleshooting screw and barrel wear).
Reattach the front end and test. Reinstall the die/head/adapter, restore power, and bring the machine up to temperature before running.
9. Frequently Asked Questions About Removing an Extruder Screw
How do I remove an extruder screw that is stuck in the barrel?
Heat the barrel evenly with its own band heaters to soften the material gripping the screw, then push the screw out from the shank end with steady hydraulic pressure — not hammering. Rotating the screw while pushing, with the barrel hot, also helps. If it is severely seized, get professional extraction rather than escalating force. Never use a torch on the screw or pry with steel tools.
Should I let the extruder cool before removing the screw?
No — pull the screw while the barrel is still hot (with heat protection). Letting it cool solidifies the residual material, which grips the screw and makes removal much harder. Purge the material out first, keep the barrel near processing temperature, and remove the screw warm.
Which way does the screw come out?
The screw is normally pushed forward and out the front (discharge end), using the machine’s screw extractor or a hydraulic pushing device at the shank end, after disconnecting the drive coupling and removing the die/head. Support the screw as it emerges, especially on long screws.
Why shouldn’t I use a torch to free a stuck screw?
A torch applies intense localized heat to the screw, which destroys the metallurgical properties of the steel and warps the precision tolerances permanently — the screw is straight and sized to thousandths of an inch. Heating the barrel evenly with its band heaters is correct; a torch on the screw ruins it. Use even barrel heat plus steady hydraulic pressure instead.
How often should I remove and inspect the extruder screw?
Industry guidance is to remove and inspect the screw at least once a year, or whenever processing performance changes (output drop, quality issues). Scheduled removal lets you measure wear and catch problems before they become an emergency — and a screw pulled on schedule comes out far more easily than one left until it seizes.
What tools do I need to remove an extruder screw?
For preparation: a purging compound, high-heat gloves, and safety glasses. For removal: the machine’s screw extractor or a hydraulic pushing device, and a hoist or support for the screw’s weight (especially long screws). For cleaning: brass tools, a brass wire brush, and copper gauze — never steel tools, which damage the surfaces.
Can I damage the screw or barrel during removal?
Yes, easily — improper removal is a common cause of damage. The main culprits are excessive/impact force, steel pry bars and scrapers that scratch the surfaces, and torches that ruin the screw’s metallurgy. Steady hydraulic pressure, even barrel heat, brass tools, and patience protect both parts.
Removing an Extruder Screw: Final Word
Removing an extruder screw from the barrel is a precision-part operation disguised as a brute-force one. The screw and barrel are worth far more than the hour you might save by forcing things, and almost all removal damage comes from impatience: cooling down first, prying with steel, torching the screw, or pushing with a jack when something is wrong. The correct approach is the opposite — purge, keep it hot, push steadily, heat evenly when stuck, use brass not steel, and stop and investigate rather than force.
Done right, pulling the screw is also your best diagnostic moment: it is when you measure wear, inspect the coating, clean properly, and decide whether the screw and barrel have life left or need attention. A screw pulled on schedule, the right way, protects both the parts and the people doing the work.
At BLOOM, we manufacture extruder screws and barrels, and we help customers with removal, inspection, repair, and replacement decisions. If you have a screw stuck in a barrel, are unsure whether a worn screw is still serviceable after pulling it, or need a replacement screw or barrel, contact our engineering team on WhatsApp — tell us your machine, the material, and what you are seeing, and we will help. For what to do with the screw once it is out, see our screw and barrel wear analysis, screw cleaning playbook, and screw repair guide.