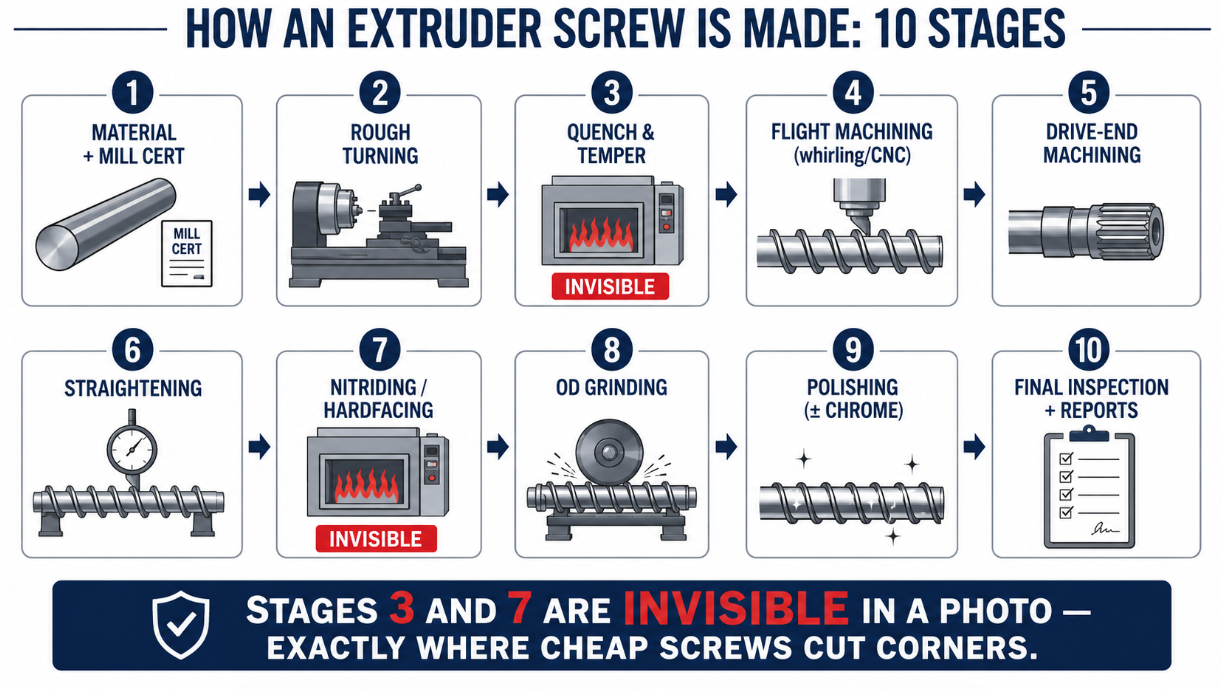
An extruder screw starts as a round bar of alloy steel (typically 38CrMoAlA) and passes through roughly ten manufacturing stages — rough turning, quench-and-temper heat treatment, helical flight machining by whirling or CNC milling, drive-end machining, straightening, surface hardening (nitriding or hardfacing), precision OD grinding, polishing, optional chrome plating, and final inspection. The whole sequence takes weeks, and two of the stages — the base heat treatment and the surface hardening — are completely invisible in a photo of the finished screw, which is exactly where low-priced screws cut their corners. Here’s the full process, why each step exists, and where quality is won or lost.
By the BLOOM Engineering Team
The Ten Stages at a Glance
| Stage | What happens | Where cheap screws cut the corner |
|---|---|---|
| 1. Material & certification | 38CrMoAlA (or specified steel) round bar, with a mill test certificate proving its chemistry | Uncertified or substituted steel — no cert, no proof |
| 2. Rough turning | Bar turned to an oversize cylinder; center holes machined for all later operations | — |
| 3. Quench & temper | Base heat treatment giving the core its strength and toughness | Skipped or shortened — the screw looks fine but lacks torsional strength |
| 4. Flight machining | The helical channels cut by thread whirling or CNC milling | Sloppy geometry — wrong channel depths mean a compression ratio you didn’t order |
| 5. Drive-end machining | Spline or keyway cut to fit the gearbox | Poor fit or sharp corners — the future fatigue-crack origin |
| 6. Straightening & stress relief | Bend from machining corrected; residual stress relieved | Skipped — a screw that isn’t straight wipes the barrel |
| 7. Surface hardening | Gas nitriding (dozens of hours at ~500°C) or hardfacing the flights | The single biggest corner: a shallow or skipped case is invisible and wears out in months |
| 8. OD grinding | Cylindrical grinding between centers to final diameter and tolerance | Loose tolerance — excess clearance from day one |
| 9. Polishing (± chrome) | Flight faces and root polished; hard chrome (0.05–0.10 mm) where specified | Rough surfaces become hang-up and degradation spots |
| 10. Final inspection | Dimensions, straightness (TIR), hardness, surface finish — with reports | No measurement, no documentation — “trust us” |
The Two Heat Treatments Buyers Confuse
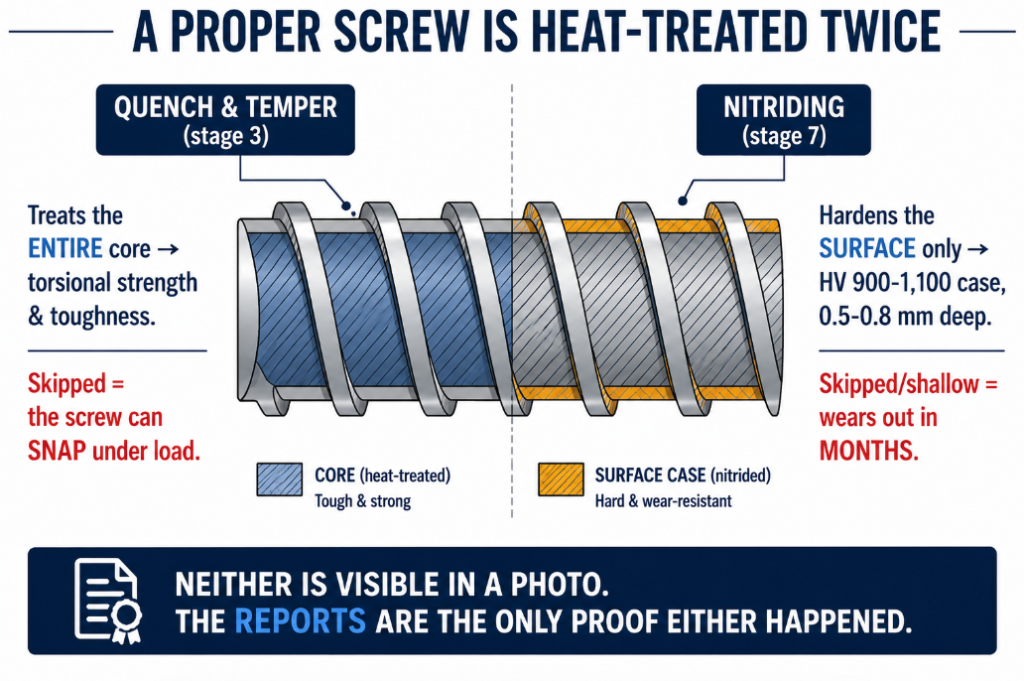
A proper screw is heat-treated twice, for two different jobs — and skipping either one produces a screw that looks identical but fails differently:
| Quench & temper (stage 3) | Nitriding (stage 7) | |
|---|---|---|
| What it treats | The whole core | The surface only |
| What it delivers | Torsional strength and toughness | A hard wear case: ~HV 900–1,100, about 0.5–0.8 mm deep |
| If it’s skipped | The screw can twist or snap under load | The screw is soft and wears out in months |
| Can you see it? | No | No |
This is why the paperwork matters as much as the part: the quench-and-temper record and the nitriding hardness/case-depth report are the only proof either treatment actually happened. A screw that broke under normal torque, or wore out in a season, very often traces back to one of these two invisible omissions — see why extruder screws break.
Cutting the Flights: Whirling and CNC Milling
The helical channels — the geometry that is the screw design — are cut on specialized machines. The classic process is thread whirling: a rotating ring of cutters encircles the slowly-turning bar and carves the helical profile in a continuous pass. Whirling is an established machining process for producing long, accurate helical profiles, and dedicated whirling/milling machining centers exist specifically for extruder screw production. Complex geometries — barrier flights, mixing sections, variable-pitch designs — are cut by CNC milling, often on the same class of machine.
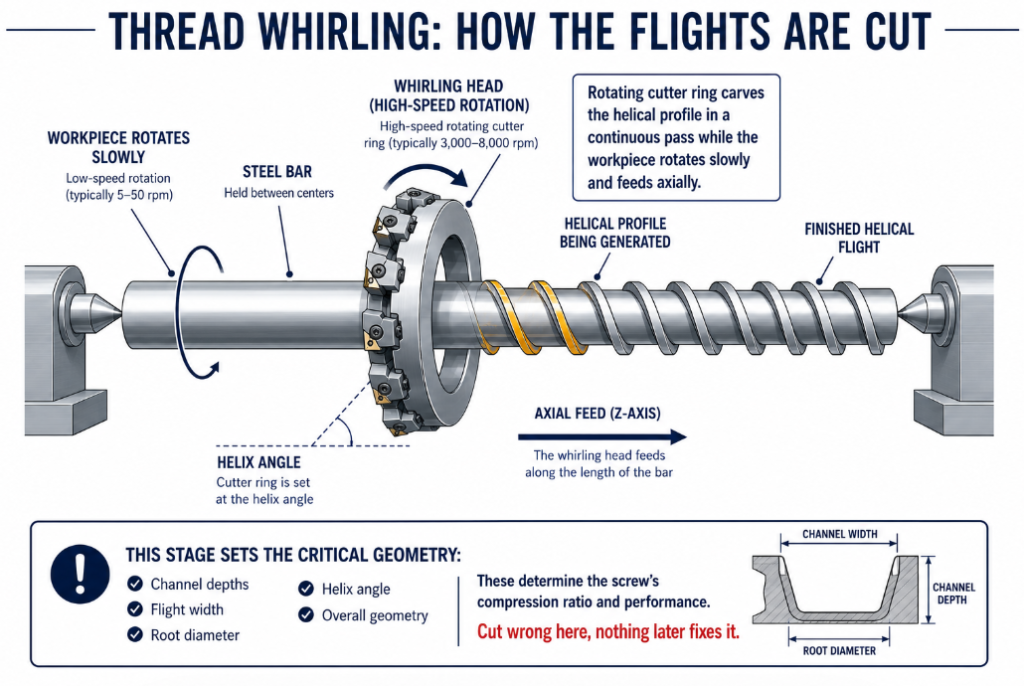
What matters to the buyer is that this stage sets the channel depths along the screw — which means it sets the compression ratio. The flight OD can be ground perfect later, but if the root diameters were cut wrong here, you receive a screw whose geometry isn’t what you ordered, and no later step fixes it. It’s one of the checks in our acceptance inspection checklist for exactly that reason.
The Surface Fork: Nitride, Hardface, or Both
After the geometry exists, the screw takes one of the surface routes, matched to the duty:
- Gas nitriding — the default. The screw spends dozens of hours (commonly 40–70) in a nitriding furnace at around 500°C while nitrogen diffuses into the steel, building the HV 900–1,100 case. Time in the furnace is what buys case depth — which is why a rushed nitride is a shallow nitride. See how thick the nitrided layer should be.
- Hardfacing — for abrasive duty, a wear alloy (Colmonoy, Stellite, or tungsten-carbide grades) is welded onto the flight tips by PTA, cooled slowly under insulation to prevent cracking, then ground back to dimension. The alloy choice is a design decision — see Stellite vs Colmonoy.
- Hard chrome plating — a thin (0.05–0.10 mm) corrosion-and-friction layer applied after grinding and polishing, used where the process is corrosive. See the full coating and surface treatment guide.
Grinding, Polishing, and Why the Mirror Finish Isn’t Vanity
Precision OD grinding between centers brings the flight diameter to its final dimension and tolerance — this is the step that determines the running clearance (as-new ≈ diameter ÷ 1,000 per side) the screw will have in your barrel. After grinding, the flight faces and root are polished. That mirror finish isn’t cosmetic: melt flows over these surfaces, and every rough patch is a place where material can hang up, sit, and degrade — the birthplace of black specks, especially on PVC. Polish quality is one of the few stages you can judge by eye on arrival.
Final Inspection: Where the Process Meets the Buyer
The last stage is measurement — flight OD along the length, root diameters (verifying the compression ratio), straightness as TIR on V-blocks (typically specified around 0.05–0.1 mm per meter), surface hardness, and finish — recorded in the reports that ship with the screw: mill certificate, hardness and case-depth report, dimensional and straightness records. A manufacturer who measures has these documents; one who doesn’t measure can’t produce them. That documentation, far more than the photos, is what separates quotes — as covered in what determines a screw’s price.
Every stage above costs machine time, furnace hours, or inspection labor — which is why the process is the honest explanation of screw pricing, and why the “same” screw quoted far cheaper almost always differs at stage 3, 7, or 10, the three stages you cannot see.
An extruder screw is weeks of turning, heat treatment, helical machining, hardening, grinding, and measurement compressed into one part — and since the two most important stages are invisible in the finished product, the real difference between screws is process discipline and the documentation that proves it.
At BLOOM, this is exactly the process our extruder screws and barrels go through — certified 38CrMoAlA, quench-and-temper before nitriding, whirled or CNC-milled geometry, precision grinding, and a full inspection report with every screw. If you want a screw quoted with the process and documentation spelled out, send our engineering team your drawing or requirements on WhatsApp and we’ll walk you through how it will be made. For specifying it correctly, see our custom screw RFQ guide.
References and Further Reading
- Manufacturing System for Production of Plastic Feed/Extruder Screws and Barrels, Modern Machine Shop — dedicated whirling and milling machining centers plus CNC finish polishing as the complete production chain for extruder screws: https://www.mmsonline.com/products/manufacturing-system-for-production-of-plastic-feedextruder-screws-and-barrels
- The Whirling Process, Gear Solutions — thread whirling as the established machining process for accurate helical profiles on screws and shafts: https://gearsolutions.com/features/the-whirling-process-for-internal-threads/