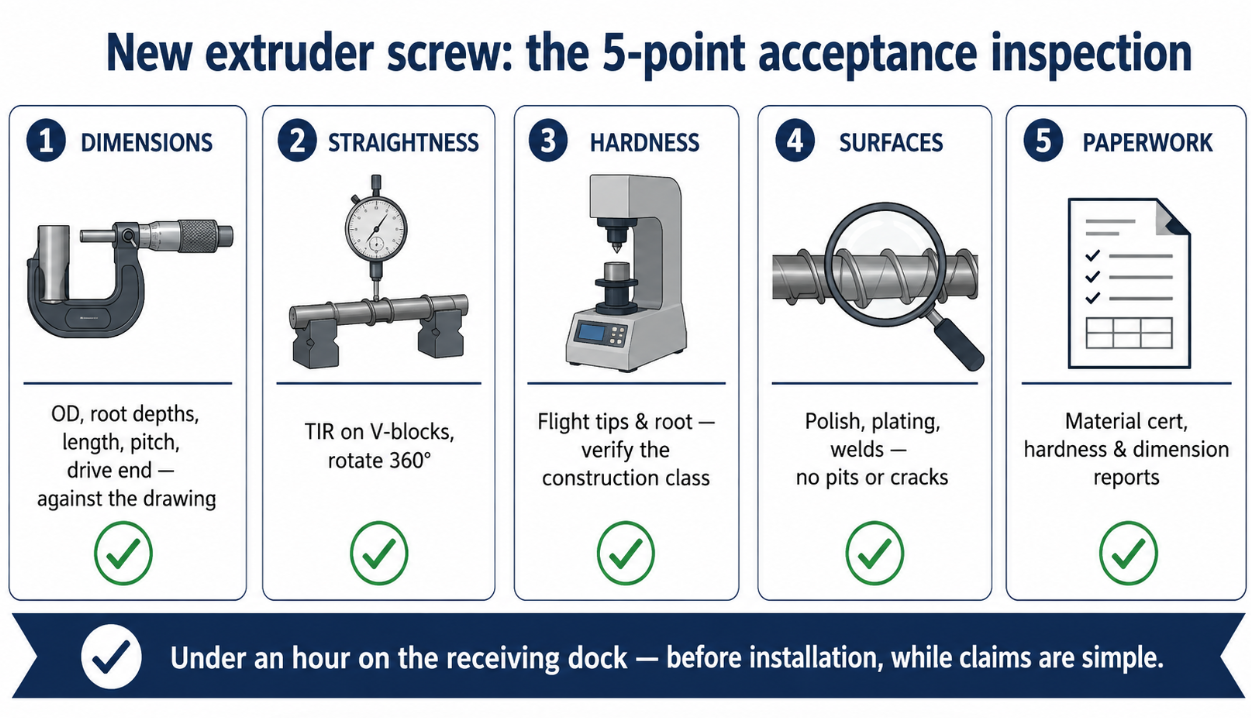
Quick answer: before a new extruder screw goes anywhere near your machine, check five things — dimensions against the drawing, straightness (TIR), surface hardness, surface finish and plating quality, and the documentation that should come with it. The whole inspection takes under an hour with a micrometer, V-blocks, a dial indicator, and a portable hardness tester, and it catches the two failures that destroy machines: a bent screw and a soft screw. We build screws for a living, and we’re writing this checklist because a buyer who inspects properly is a buyer we never have a dispute with — an honest manufacturer welcomes this inspection, and you should be wary of one who doesn’t.
By the BLOOM Engineering Team
Why Inspect Before Installing
Two reasons make the arrival inspection non-negotiable:
- A bad screw damages more than itself. A bent screw wipes the barrel wall as it turns — one out-of-spec part can take a good barrel with it. A screw with soft flights wears out in months instead of years and sheds the problem into your product. Catching either on the receiving dock costs an hour; catching it after installation costs a barrel, a production run, or both.
- Installation usually ends the conversation. Practically speaking, a defect documented on arrival — with photos and measurements — is a straightforward replacement claim. A defect discovered after the screw has run is a negotiation. Inspect while the screw is still in its crate, and photograph what you measure.
Check 1: Dimensions Against the Drawing
The drawing (yours or the manufacturer’s confirmed drawing) is the contract — measure the screw against it, not against memory:
| What to measure | Tool | What to verify |
|---|---|---|
| Flight OD | Outside micrometer, at 4–6 points along the length | Matches drawing; consistent end to end (taper = grinding error) |
| Root diameter, feed & metering | Micrometer or caliper over the root | Channel depths correct → compression ratio is what you ordered |
| Overall & flighted length | Tape / rule | Matches drawing |
| Pitch | Rule across several flights | Matches drawing |
| Drive end / shank | Micrometer, thread gauge | Fits your gearbox coupling — the most annoying thing to discover late |
| Clearance vs your barrel | Compare screw OD to your measured bore | Running clearance ≈ diameter ÷ 1,000 per side against the bore it will actually run in |
The compression-ratio check deserves emphasis: the flight OD can be perfect while the channel depths are wrong, and you’d never see it by eye — but you’d feel it in the melt quality from day one. Measuring root diameters at the feed and metering zones takes two minutes and verifies the geometry you actually paid for; see our guide on how to measure compression ratio.
Check 2: Straightness (TIR)
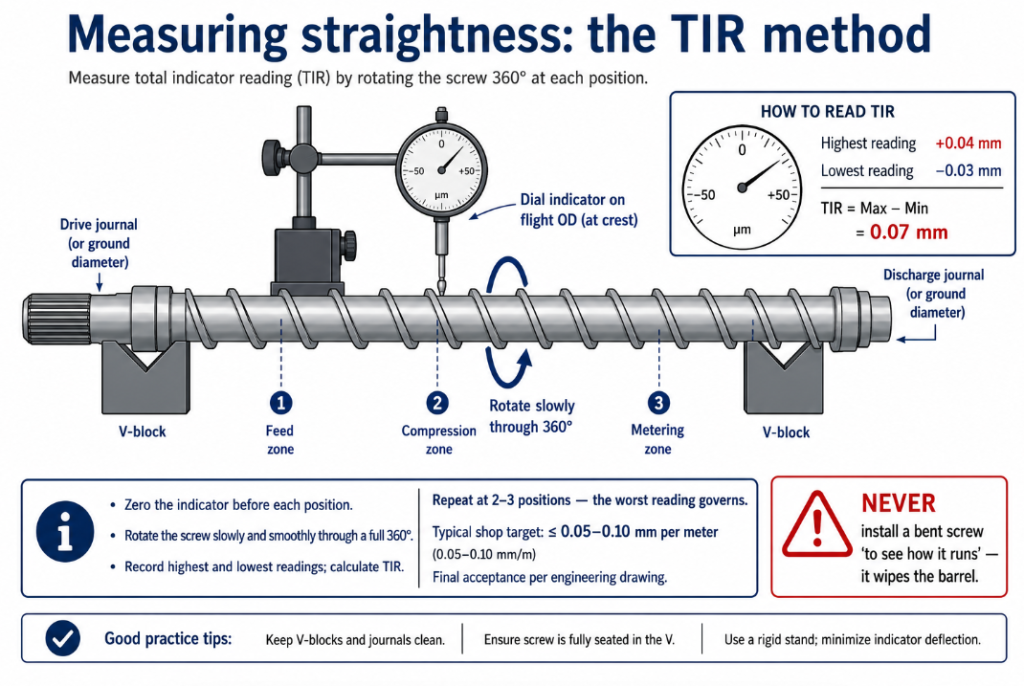
Straightness is the single most important mechanical check, because a bent screw destroys itself and the barrel. The method is simple and standard:
- Rest the screw on two V-blocks or rollers near its ends.
- Set a dial indicator on the flight OD near the middle of the screw.
- Rotate the screw slowly through a full 360°.
- The total swing of the needle — highest reading to lowest — is the TIR (total indicator reading).
- Repeat at two or three positions along the length; the worst reading governs.
The drawing governs the acceptance limit; as a working reference, extruder screws are typically specified somewhere around 0.05–0.1 mm TIR per meter of length, and long, slender screws are where the check matters most. If the needle swings well beyond the drawing figure, stop — do not install a bent screw “to see how it runs.” It will run itself and your barrel into scrap.
Check 3: Hardness — the Check Most Buyers Skip
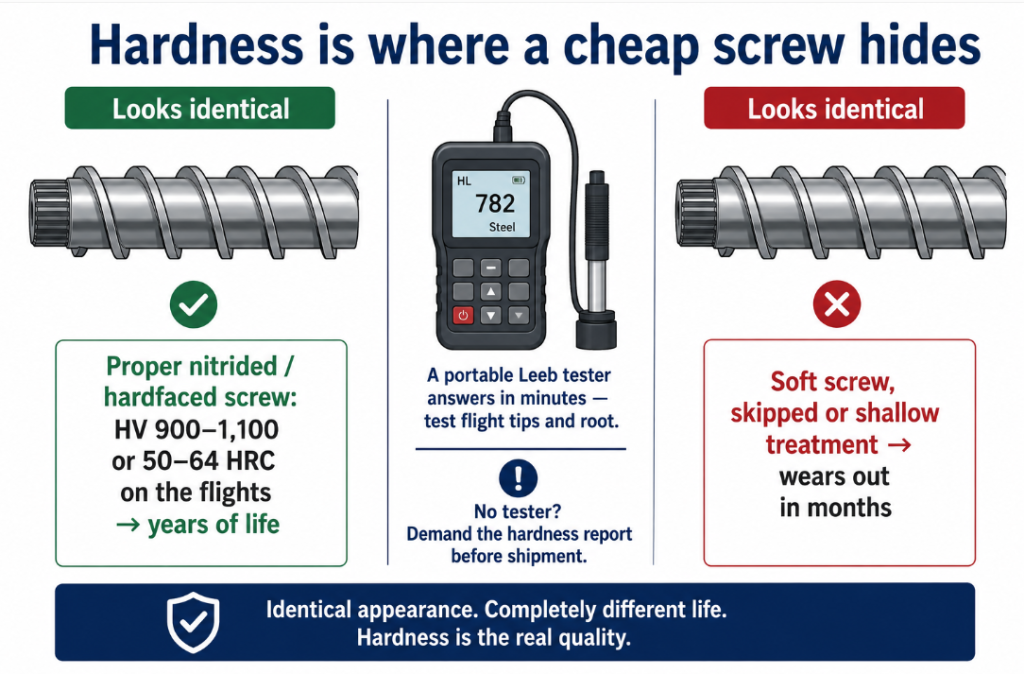
Hardness is where a cheap screw hides. It looks identical to a good one; it just wears out several times faster. A portable (Leeb-type) hardness tester answers the question in minutes — test on the flight tips (the wear surface) and on the root, and compare against what the construction should deliver:
| Construction | Where to test | What you should see |
|---|---|---|
| Nitrided 38CrMoAlA | Flight tip & root | ~HV 900–1,100 surface; case depth 0.5–0.8 mm (case depth is on the mill report, not testable on the dock) |
| Hardfaced flights, Colmonoy 56 type | Flight tip | ~50–55 HRC |
| Hardfaced flights, Colmonoy 83 / tungsten-carbide type | Flight tip | ~59–64 HRC |
| Hard chrome over base | Flight & root | Chrome adds corrosion/friction protection; hardness reading reflects plating over substrate |
Two practical notes. First, readings on a curved, plated, or thin-cased surface carry some scatter — you’re verifying the class of hardness (is this really nitrided? really carbide-grade hardfacing?), not auditing to a single point. Second, if you don’t have a tester, ask for the hardness report before shipment — a manufacturer who measures will have one. The alloy-by-alloy background is in our Stellite vs Colmonoy guide and 38CrMoAlA design guide.
Check 4: Surface Finish, Plating, and Welds
Run your eyes and fingers down the screw under good light:
- Polish. Flight faces and root should be smoothly polished — melt flows over these surfaces, and roughness becomes hang-up spots (and, in PVC, degradation points).
- Chrome plating, where specified, should be uniform and typically around 0.05–0.10 mm thick (on the report), with no pits, peeling edges, or dull patches — plating defects become corrosion and flaking sites.
- Hardfacing welds on the flight tips should be continuous and ground flush — no visible porosity, cracks, or unfilled spots. Reputable shops verify welds with dye-penetrant; the checkmark belongs on the inspection report.
- No handling damage — dings on flight edges from shipping are small but real; note them on arrival.
Check 5: The Paperwork
A screw should arrive with its evidence. Ask for, and keep:
- Material certificate for the base steel (e.g., 38CrMoAlA mill cert)
- Hardness report (surface values; nitriding case depth)
- Dimensional inspection report against the drawing
- Straightness/TIR record
The documentation is not bureaucracy — it’s the difference between a supplier who measured and one who hopes. If a quote can’t include these reports, that tells you what the quality system looks like; our custom screw RFQ guide covers how to specify all of this before you order, which is when it’s easiest.
If Something Fails
Measure it twice, photograph the setup and the reading, and contact the manufacturer before doing anything else — especially before installing. A documented arrival defect is a replacement; a screw that has run is a debate. Any serious manufacturer will ask for exactly the photos and numbers you just took, which is one more reason the hour on the receiving dock is the best-spent hour in the whole purchase.
An acceptance inspection is five checks and less than an hour — dimensions, straightness, hardness, surfaces, paperwork — and it converts the biggest risk in buying a screw (that you find out its quality only after it’s in the machine) into a solved problem on the dock.
At BLOOM, every extruder screw and barrel ships with the dimensional, hardness, and straightness reports this checklist asks for — because we’d rather you verify than trust. If you want a screw quoted with the full inspection documentation included, send our engineering team your drawing or requirements on WhatsApp and we’ll build it to spec and prove it.
References and Further Reading
- Screw Shaft Straightness & Defects, Roton Products — the V-block and dial-indicator method for measuring straightness as TIR: https://www.roton.com/screw-university/screw-actions/screw-shaft-straightness-defects/
- What is TIR in Manufacturing?, MTI — total indicator reading defined and how it’s measured on rotating parts: https://www.mtiwelding.com/blog/what-is-tir/