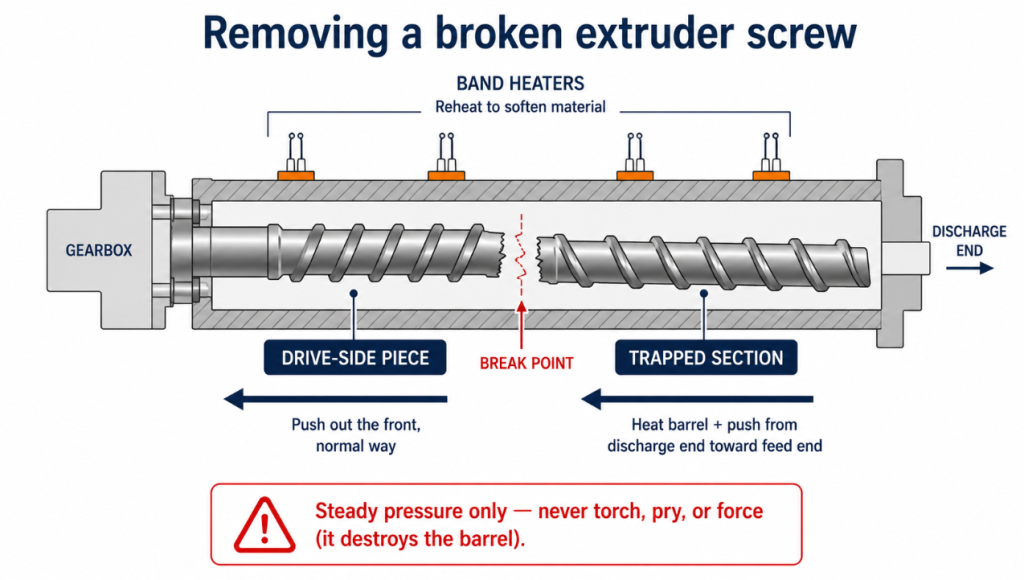
Quick answer: a broken screw is removed in two parts — the drive-side piece pushes out the normal way (from the shank end), but the broken-off section trapped inside the barrel must be heated and pushed out from the discharge end back toward the feed end, or machined out as a last resort. It is one of the most difficult extruder repairs, and forcing it risks destroying the barrel. Here is how to do it without turning a broken screw into a scrapped barrel — and how to stop it happening again.
By the BLOOM Engineering Team
First: Stop and Assess Before You Apply Any Force
A snapped screw is the situation where panic does the most damage. Before touching it, understand what you are dealing with:
- Where did it break? Usually at the screw’s weakest cross-section — often the feed section or a root that has been thinned by wear. You typically have a drive-side piece (still connected to the gearbox) and a trapped section (loose inside the barrel).
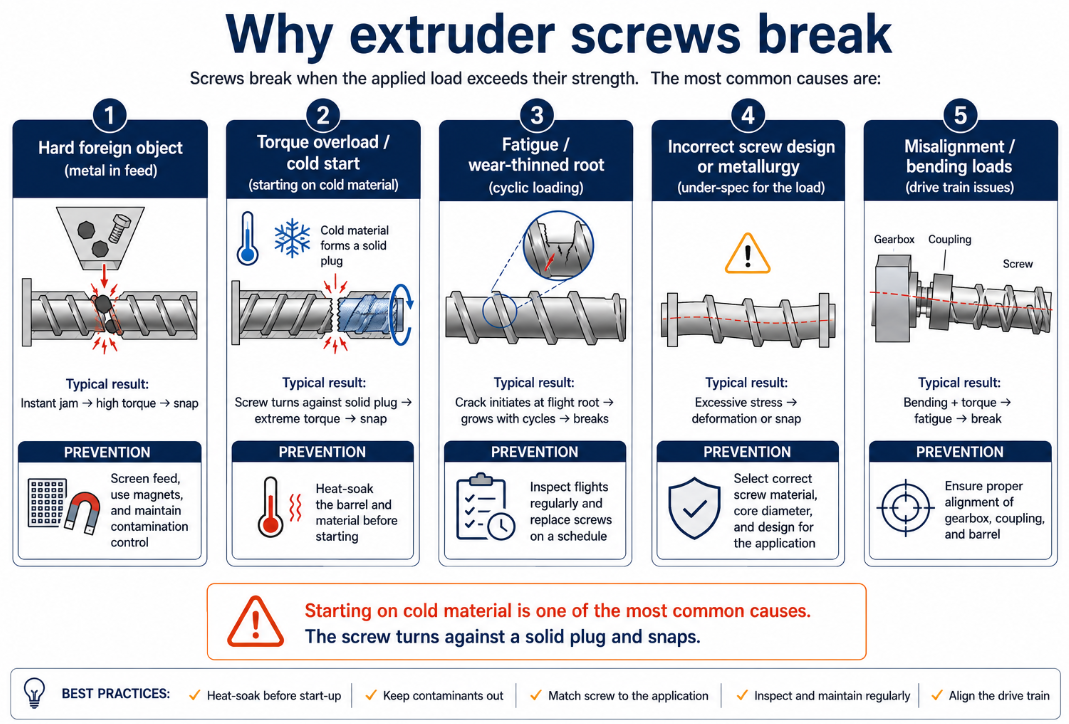
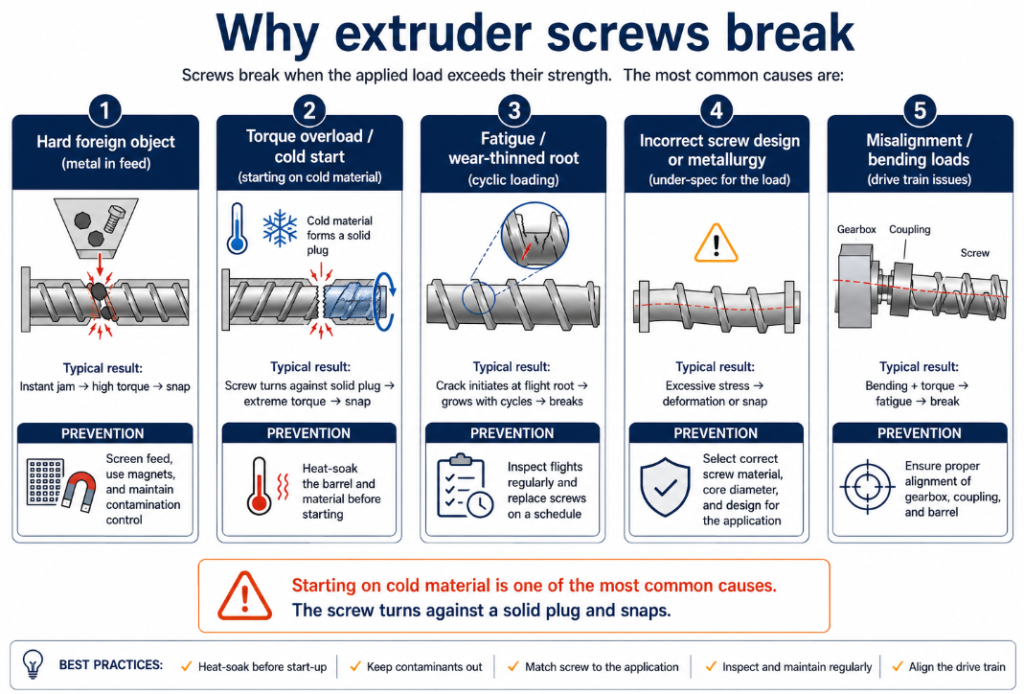
- Why did it break? This matters for both removal and prevention (covered at the end). A screw that snapped from a hard foreign object, a torque overload, or fatigue tells you something about what to fix.
- What is the barrel worth? The whole point of careful removal is that the barrel is expensive and reusable — the wrong approach to a broken screw can score or destroy the bore, turning a screw replacement into a screw-and-barrel replacement.
Do not start hammering or levering. A broken screw is removable with heat and steady force; it is not removable with brute force without collateral damage.
Step-by-Step: Removing the Broken Screw
Part 1 — The Drive-Side Piece
The piece still attached to the drive comes out the normal way:
- Lock out the machine and gear up — power off, locked out, high-heat gloves and safety glasses. The barrel is hot.
- Purge what you can and remove the die, head, or adapter to clear the discharge end.
- Disconnect the coupling/gearbox at the shank.
- Push the drive-side piece out the front from the shank end using a hydraulic pushing jack or threaded push rod — the same method as a normal removal, just on a partial screw.
Part 2 — The Trapped Broken Section (the hard part)
The broken-off piece loose inside the barrel is the challenge. The key is direction and heat:
- Keep the barrel hot — or reheat it. Bring the barrel back up with its band heaters to soften any material gripping the broken section. For stubborn cases, industry practice is to heat the barrel substantially (well above normal set points) and hold it for an hour or more to thoroughly soften the residual material around the trapped piece.
- Push it out from the discharge end toward the feed end. This is the critical direction: a broken section (or a hard object) trapped inside the barrel is pushed from the discharge end back toward the feed end — the opposite direction from a normal screw pull. Use a push rod sized to the bore through the discharge end, with steady hydraulic or mechanical pressure.
- Use steady pressure, never impact. The trapped piece may move slowly. Keep the force steady and aligned with the bore axis — misalignment scores the barrel.
Part 3 — When It Won’t Come Out: Machining
If heat and steady pushing fail and the broken section is truly seized, the last resort is to machine it out — boring out the broken piece on a machine tool, which requires specialist equipment and risks the barrel. At this point, an honest cost assessment is essential: an extruder screw/barrel specialist (or sending the barrel out) is far safer than escalating force. And there is a hard truth from the trade — if a trapped piece genuinely cannot be pushed out, the barrel may be scrapped, and forcing it out by brute strength damages the bore so badly that it ruins normal production afterward anyway. Sometimes the honest answer is that the barrel is lost.
A Critical Warning: Force Destroys the Barrel
The single most important rule with a broken screw: the broken screw is already lost — your job is to save the barrel. Every destructive shortcut trades a cheap loss for an expensive one:
- No torches on the trapped piece — localized flame ruins the barrel bore’s hardened surface and any liner.
- No steel pry bars or chisels down the bore — they gouge the precision bore permanently.
- No misaligned pushing — off-axis force scores the bore.
- No “just force it harder” — if steady pressure plus heat won’t move it, more force damages the barrel, not frees the screw.
The barrel is the prize. A broken screw is going to be replaced no matter what; a scored or destroyed barrel doubles the cost of the failure.
Why Did the Screw Break? Fix the Root Cause
Replacing a broken screw without understanding why it broke invites a repeat. The common causes:
| Cause | What happened | How to prevent |
|---|---|---|
| Hard foreign object | Metal/contaminant jammed the screw, overloading it | Feed screening, magnets, careful material handling |
| Torque overload | Cold start, frozen melt, or jam exceeded the screw’s strength | Proper heat-soak before starting; never start on cold material |
| Fatigue / wear | A root thinned by wear or a stress riser failed over time | Regular wear inspection; replace before it gets critical |
| Design/material weakness | Under-spec screw for the duty | Correct screw material and design for the load |
A frequent culprit is starting the machine before the material is fully molten — the screw tries to turn against a solid plug and snaps. Proper heat-soak before startup prevents many broken screws. And a screw whose root has thinned from wear is far more likely to break, which is one more reason to inspect on schedule — see our guide on how much screw wear is acceptable.
The Bottom Line
A broken extruder screw comes out in two parts: the drive-side piece pushes out the front normally, and the trapped section is heated and pushed out from the discharge end toward the feed end — or, as a last resort, machined out. Throughout, the governing principle is that the screw is already lost, so every action should protect the expensive, reusable barrel: heat and steady aligned pressure only, never torches, steel bars, or brute force. Then find out why it broke — hard object, torque overload on a cold start, or a wear-thinned root — so the replacement does not meet the same end.
For the full removal procedure on an intact screw, see our guide on how to remove an extruder screw from the barrel, and for assessing the barrel afterward, barrel relining and replacement signs.
At BLOOM, we manufacture replacement extruder screws and barrels, and we can help you assess whether a barrel is salvageable after a broken screw — and design a replacement screw correctly specified for your load so it does not break again. Send our engineering team your machine details and what happened on WhatsApp and we will help.