extruder screws break from torque overload or fatigue — most often a cold start (turning the screw before the material is fully melted), a hard foreign object entering the barrel, or long-term cyclic stress that fatigues the shaft until it cracks, usually at a stress concentration like the keyway or spline root. A screw doesn’t normally snap from steady running; it breaks when something spikes the torque past what the shaft can carry, or when years of stress cycles finally initiate a fatigue crack. Understanding which of these happened matters, because if you replace the screw without fixing the cause, the new one breaks too. Here are the real failure modes, where screws crack, and how to prevent it.
The Two Ways a Screw Breaks: Overload vs Fatigue
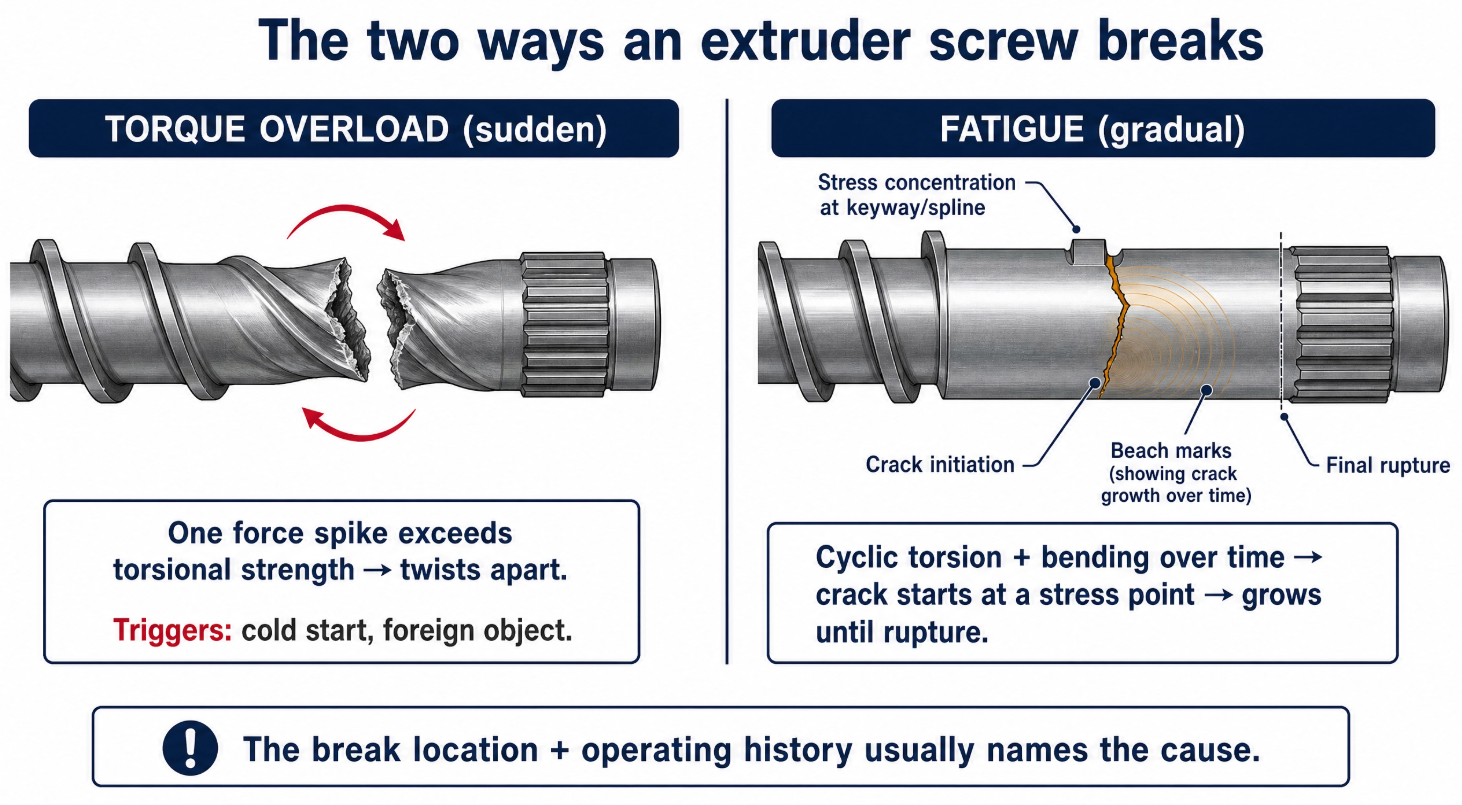
Every screw fracture is fundamentally one of two mechanisms, and telling them apart guides both the fix and the prevention.
- Torque overload (sudden). A force spike exceeds the shaft’s torsional strength and it twists apart in one event. The classic triggers are a cold start and a foreign object — both slam the screw with resistance it wasn’t turning against a moment before.
- Fatigue (gradual). Cyclic torsion and bending stresses, cycle after cycle, initiate a tiny crack — usually at a stress concentration — that grows invisibly until the remaining cross-section can’t carry the load and it lets go. Failure analyses of broken extruder shafts repeatedly identify the cause as combined torsion and bending producing high-cycle fatigue, with the crack starting at features like the keyway or spline.
The fracture face tells the story to a trained eye: a fatigue break shows a smooth, progressive crack zone with beach marks and a final sudden-rupture region, while a pure overload twist shows spiral deformation. But you rarely need the metallurgy — the operating history and the break location usually name the cause:
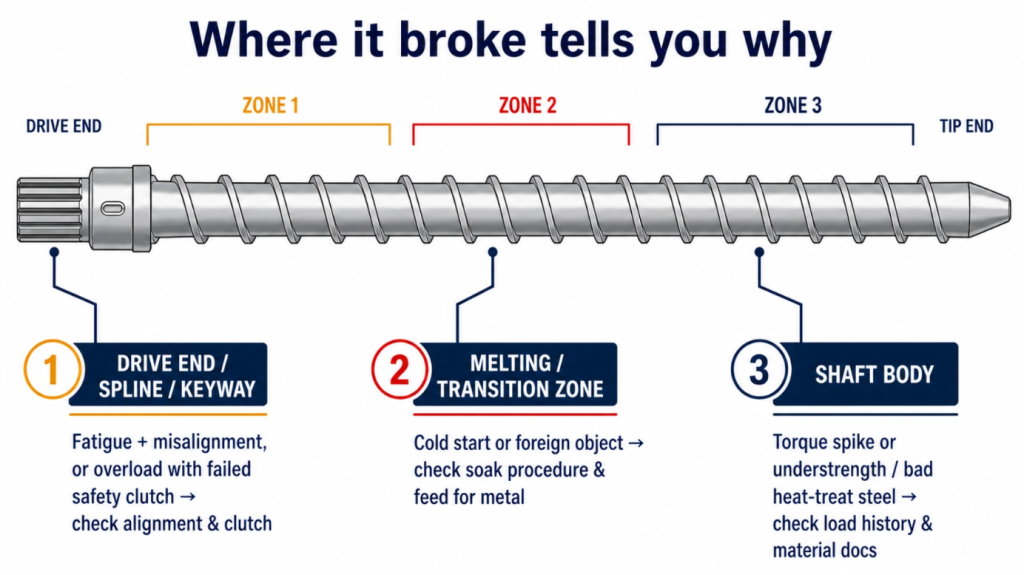
| Where it broke | Most likely cause | First thing to check |
|---|---|---|
| Drive end / spline / keyway | Fatigue + misalignment, or overload with failed safety clutch | Coupling alignment; safety clutch/shear coupling |
| Melting/transition zone | Cold start, or foreign object | Soak procedure; feed for tramp metal |
| Shaft body | Torque spike, or understrength/bad heat-treat steel | Load history; material & hardness documentation |
The break location plus what happened in the minutes (or years) before failure usually points straight at the mechanism.
Cause 1: Cold Starts — the Number-One Screw Killer
The most common operational cause of a broken screw is starting the extruder before the material is fully molten. Solid or partially-melted polymer has enormous resistance; when the screw tries to turn against a barrel full of unmelted material, the torque spikes far past normal, and something has to give — often the screw.
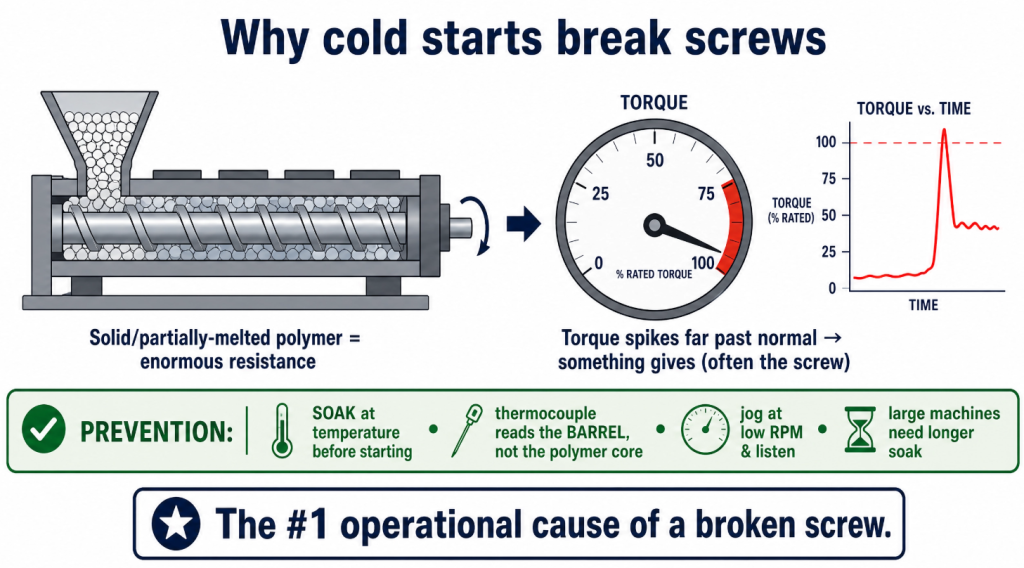
Prevention is procedural and absolute:
- Soak at temperature before starting. Once the zones reach setpoint, hold — give the material time to actually melt through, not just the barrel to read hot. Large machines need longer soak times than the controller suggests.
- Never start on a cold or under-soaked barrel. The reading at the thermocouple is the barrel, not the polymer core.
- Jog, don’t slam. Start at low RPM and listen; if torque is high, stop and soak longer.
- Train every operator on it. Cold-start breakage is almost entirely a training and discipline problem — the machine will happily destroy its own screw if allowed to start cold.
Cause 2: Foreign Objects and Contamination
A piece of tramp metal, a bolt, a broken thermocouple tip, or a chunk of hard contaminant entering the feed can jam between screw and barrel, spiking the load instantly. On many machines a safety clutch or shear coupling is designed to disconnect when torque exceeds a limit — but if it’s missing, mis-set, or seized, that protection is gone and the screw takes the full hit.
Prevention:
- Keep tramp metal out — magnets and screens over the feed throat, and discipline about tools and hardware near the hopper.
- Verify the torque-limiting protection works — a safety clutch that never trips because it’s seized is not protection. This is part of why a screw that broke needs a machine inspection, not just a new screw.
- Watch for the warning — a sudden load or amperage spike is the screw telling you something hard just entered.
Cause 3: Fatigue — When Time and Stress Concentrations Add Up
Even without a single dramatic overload, screws break from fatigue after long service. Cyclic torsion and bending — every revolution, for years — eventually initiates a crack, and cracks start where stress concentrates: the keyway, the spline root at the drive end, undercuts, sharp radii, or corrosion pits. One documented failure occurred after ~15 years of service, initiating at the splined drive end at the gearbox coupling, driven by fatigue and shaft misalignment.
Fatigue-related prevention is about reducing the stress and the concentrators:
- Correct shaft/coupling alignment. Misalignment adds a bending load on top of torsion — a major fatigue driver at the drive end. Align precisely on installation and after any gearbox work.
- Address corrosion. A corrosive process pitting the shaft creates crack-initiation sites; corrosion plus cyclic stress is a classic fatigue accelerant.
- Monitor vibration. Rising vibration signals misalignment, imbalance, or a developing crack — catch it before fracture.
- Respect the drive end. The spline/keyway is the highest-stress region; damage, wear, or a poor repair there is where the next break starts.
Cause 4: The Screw Was Never Strong Enough
Sometimes the screw’s own construction is the root cause. A screw made from understrength steel, or one that never received proper heat treatment, carries hidden weakness that shows up as sudden breakage under a torque the shaft should have survived. This is a design-and-manufacturing failure, not an operating one:
- The base steel must provide torsional strength, not just a hardenable surface. High-torque and long screws especially need a core specified for the load — surface hardness alone doesn’t carry torque.
- Proper heat treatment is not optional. A screw that skipped or botched heat treatment can look identical to a good one and break under normal load. This is exactly what the acceptance inspection and mill/hardness documentation exist to catch.
- The design has to match the torque. Matching the screw’s material and geometry to the drive torque is a core part of getting the design right — see our screw design guide and material selection guide.
If Your Screw Has Broken
The urgent instinct is to order an identical replacement and get running. Do that — but diagnose the cause first, or you’ll break the replacement:
- Note where it broke. Drive-end/spline points to alignment or fatigue; a break in the melting zone points to a cold start or foreign object; a shaft-body break suggests a torque spike or a material/heat-treat weakness.
- Review the moments before failure. A cold start? A load/amperage spike (foreign object)? Temperature fluctuations? Years of service (fatigue)?
- Inspect the machine, not just the screw. Check the safety clutch/shear coupling, the gearbox alignment, the heater bands (a dead zone that left material unmelted), and the barrel for damage.
- Fix the cause, then replace. If it was a cold start, retrain and set a soak procedure; if alignment, realign; if the screw was understrength, upgrade the specification rather than repeating it.
Broken shafts can sometimes be repaired by welding and re-heat-treating, but for most production screws a properly-specified replacement — with the cause corrected — is the reliable path back to running.
A broken screw is almost always a symptom, not bad luck: a cold start, a foreign object, accumulated fatigue at a stress point, or an understrength screw — so the replacement only lasts if the cause is found and fixed, whether that’s an operating procedure, a machine alignment, a safety-clutch check, or a stronger screw specification matched to your drive torque.
At BLOOM, we manufacture replacement extruder screws and barrels built from properly heat-treated, correctly-specified steel matched to your machine’s torque — and we’ll help you work out why the last one broke so the next one doesn’t. If your screw has failed, send our engineering team photos of the break, your machine details, and what you were running on WhatsApp and we’ll help diagnose the cause and get you a replacement built right. To verify a new screw’s integrity on arrival, see our acceptance inspection checklist.
References and Further Reading
- Failure Analysis of Twin Screw Extruder Shaft, Journal of Failure Analysis and Prevention (Springer), 2021 — splined drive-end fracture after ~15 years from high-cycle fatigue under rotating-bending load, associated with coupling misalignment: https://link.springer.com/article/10.1007/s11668-021-01208-5
- Investigation of shaft and segment failure in co-rotating twin-screw extruder, Engineering Failure Analysis (ScienceDirect), 2024 — fatigue fracture from cyclic torsion and bending, crack initiation and temperature-fluctuation context: https://www.sciencedirect.com/science/article/abs/pii/S1350630724009233
- Failure Analysis and Repair of a Broken Extruder Shaft, European Journal of Engineering and Technology Research, 2020 — combined torsion and bending producing fatigue fracture initiating at the keyway, and weld repair with re-heat-treatment: https://eu-opensci.org/index.php/ejeng/article/view/61738