When black specks and carbon streaks persist, you don’t need more guesswork—you need a tight, defensible procedure. This guide is written for process engineers and maintenance managers who are tackling severe carbon buildup after degradation. It lays out a hybrid path for extruder screw cleaning with clear escalation from mechanical purging to chemical or soak purging and, if needed, a screw pull and manual cleaning. Safety gates, parameter windows, and acceptance criteria are embedded so you can document and repeat results.
Before any intrusive work, apply lockout and verify zero energy per the requirements in OSHA’s Control of Hazardous Energy, known as LOTO. See the official text in OSHA 29 CFR 1910.147 under the descriptive link Control of Hazardous Energy. According to the standard, you must isolate, lock, and verify before servicing. Reference: the full regulation in the official repository, available as the authoritative source here: OSHA 1910.147 Control of Hazardous Energy. When guards must be removed or when hazardous motion is possible, align with plastics machinery guarding expectations. Reference: OSHA plastics machinery eTool overview. For respiratory protection planning and PPE selection, consult NIOSH’s respiratory protection toolkit and follow your facility’s written program.
Quick decision tree for severe specks
Think of this like a staged pressure wash for your flow path. First, confirm it’s carbon and not unmelt or pigment agglomerate. Then move in escalating tiers—only advance when the previous tier’s objective criteria are not met.
- Pre checks in brief: verify safe to approach, confirm ventilation is operating, review material history for long residence time or heat spikes, and ensure compatible purging compounds are on hand with their SDS and TDS.
- Tier 1 mechanical or hybrid purge: use high shear and backpressure with a mechanical or hybrid purging compound. Cycle speeds, exchange multiple barrel volumes, and target turbulence.
- Tier 2 chemical or soak purge: apply a heat activated grade, hold for controlled soak periods, then purge aggressively and flush.
- Tier 3 screw pull and manual cleaning: hot disassembly with non marring tools, followed by measured inspection before restart.
Escalation trigger example: if black specks persist after two to three mechanical cycles totaling three to five barrel volume exchanges with stable temperatures and confirmed turbulence, proceed to Tier 2. If specks persist after two chemical soak cycles with proper temperatures and post soak flush, schedule Tier 3.
Rapid diagnostics to avoid chasing the wrong defect
Carbonized specks typically appear matte to glossy black with irregular edges and correlate with high heat or excessive residence time. Unmelt gels often look translucent or pearly and deform rather than fracture under pressure. Pigment agglomerates tend to match the masterbatch color and disperse with additional mixing. Tie your observations to recent history: extended idles at full temperature, profile errors at the die, vent seal failures, or a change from reactive resins can all seed carbon.
A practical tip: collect a short strand of purge, press it into a thin ribbon, and inspect on a light table. If the particle smears gray and leaves residue, it’s often degraded polymer; if it stays glassy and clear edged, suspect unmelt. You can also check a few pieces under a shop microscope for morphology before committing downtime.
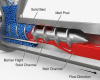
Tier 1 — Extruder screw cleaning via mechanical or hybrid purge
Intent: create turbulence and scrubbing to dislodge layered carbon in accessible channels. Base parameters on a mechanical or hybrid purging compound’s TDS, then tune within OEM limits. Practical patterns are consistent with field notes summarized by Plastics Technology in shutdown and purging practices and with neutral vendor procedure notes on speed and backpressure.
Reference for procedural context: Plastics Technology purging and shutdown practices and a neutral technique discussion on speed and pressure effects: Asaclean on backpressure and screw speed.
- Stabilize temperatures near the current resin’s process window. For aggressive scouring, many shops raise barrel and die zones by roughly 10–30 °C within the lower of resin, purge compound, and OEM limits.
- Load the mechanical or hybrid purging compound until it appears at the die. Keep screw speed low until flow is consistent.
- Increase to the highest safe speed you can sustain and introduce variability: short bursts, slow rolls, and brief pauses. Use moderate to high safe backpressure to keep the screw forward and amplify scrubbing. Watch torque and head pressure.
- Plan for multiple exchanges. For severe carbon, three to five barrel volume equivalents is a realistic starting plan. Record mass used to inform the next run.
- When output appears clear, switch to a neutral resin or your production resin for a short flush while maintaining turbulence. Pull test samples for quick visual checks.
Escalate if needed: if visible specks persist after the planned exchanges and a flush at steady temperatures, move to Tier 2.
Tier 2 — Extruder screw cleaning with chemical or soak purge
Intent: penetrate dead zones and layered carbon with a heat activated purging compound, then aggressively clear loosened residue and flush. Soak durations and temperatures must follow the purging compound’s TDS.
Reference for workflow envelopes and selection logic, used neutrally: the Asaclean method notes on extrusion grade selection and soak time guidance and the Davis Standard tutorial for visualizing hot cleaning techniques. See: How to pick a purging compound for extrusion and Davis Standard feedscrew cleaning tutorial.
- With the machine at the upper end of the resin’s safe process temperature, introduce the chemical purging grade until it reaches the die.
- Reduce screw speed to minimum and hold for a controlled soak, commonly five to fifteen minutes per the TDS. Maintain ventilation and monitor for fumes.
- If streaks persist at the die, selectively lift die face temperature by about 10–30 °C while staying within limits, refill with purge, and repeat the soak.
- After soaking, purge with variable high shear and elevated safe backpressure to mobilize residues released during soak.
- Flush with a neutral or production resin until output is visually clean. Collect samples for inspection and log soak times and temperatures.
Special caution for acetal changeovers: avoid any cross contamination with PVC or acidic residues and maintain robust local exhaust. For process safety notes and formaldehyde risk controls tied to acetal, consult a resin producer’s guide such as Celanese acetal processing guidance and align with your SDS.
Escalate if needed: if black specks persist after two correctly executed soak cycles followed by aggressive purge and a neutral flush, schedule a screw pull.
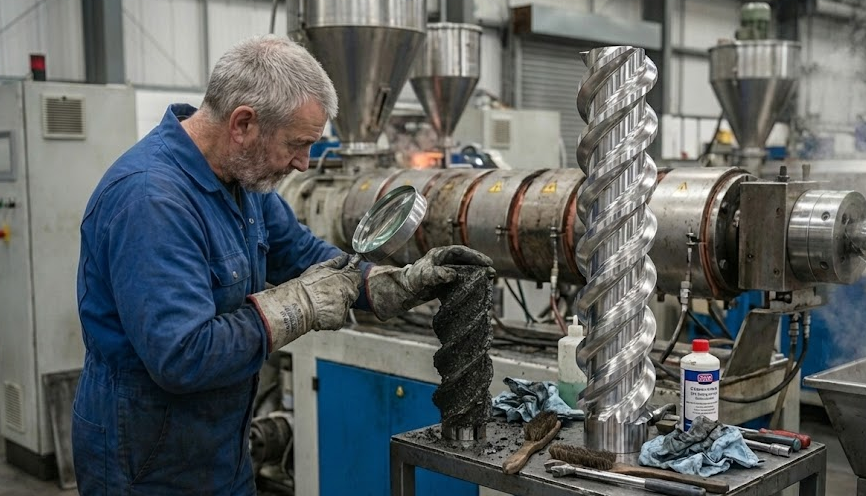
Tier 3 — Extruder screw cleaning by screw pull and manual cleaning (safety first)
Intent: remove hardened carbon and inspect wear when in line purging cannot achieve acceptance. Perform hot disassembly with non marring tools, then document tolerances before restart.
Authoritative procedural context: OSHA plastics machinery guarding guidance for servicing with guards removed and the visual technique steps shown in Davis Standard’s feedscrew cleaning tutorial.
- Complete a pre job brief with EHS, confirm LOTO per OSHA 1910.147, and verify ventilation. Keep zones hot enough to prevent polymer solidification while you empty the barrel and remove the die or adapter safely.
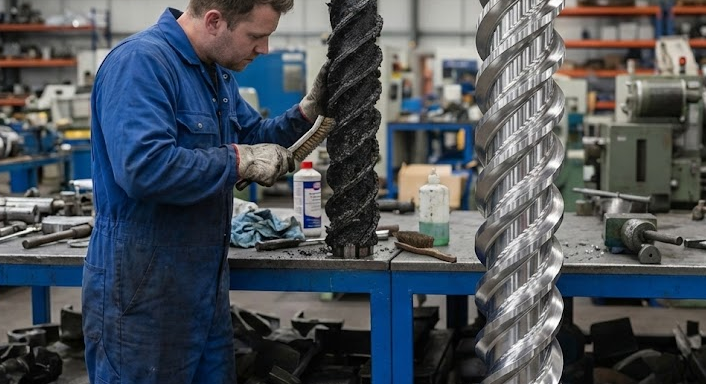
- Advance the screw using the OEM method. As each section emerges, clean immediately while hot: use brass brushes, copper gauze, non marring scrapers, and cleaning aids like stearic acid flakes. Do not use steel tools and never use open flame to burn off polymer.
- Clean the barrel hot with a brass brush wrapped in copper gauze. Rotate with a low speed drill for uniform contact without scoring.
- After controlled cooling, measure and record wear. Check flight OD, channel depth, and clearance against OEM tolerances. Replace or rework if out of limits.
- Reassemble per OEM torque specs and restart using a neutral resin purge before returning to production.
Verification and acceptance that stand up to audits
Visual inspection remains the pragmatic standard in the literature, but that doesn’t mean it has to be vague. Define an internal acceptance rule tied to your product’s risk profile. For example, for clear parts or film, require zero black specks at or above 0.1 mm across 100 consecutive parts or across a defined length of film or sheet. Capture photos of purge strands and first articles under consistent lighting with a reference scale.
Log the parameters you controlled: zone and die temperatures, screw rpm and backpressure trends, purging compound lot and mass, number of barrel volume exchanges, soak durations, and any selective temperature lifts. These records allow you to troubleshoot quickly and show due diligence during customer or regulatory audits.
If you need external context for why visual acceptance is common practice during cleanup and restart, see Plastics Technology’s shutdown and purging overview, which aligns with the staged approach documented here.
Troubleshooting and prevention program
Build prevention into normal operations so you aren’t fighting the same specks every week. Use sealing purges for extended shutdowns, avoid idle time at full temperature, verify vent seals and vacuum stability, and schedule periodic preventive purges.
Below is a compact field matrix you can use during shift handover.
| Symptom | Likely cause | Immediate action |
|---|---|---|
| Persistent black specks after Tier 1 | Layered carbon in dead zones or insufficient turbulence | Repeat Tier 1 with speed cycling and higher safe backpressure, then proceed to Tier 2 if still present |
| Specks worsen during idle | Overheated zones or long residence time | Reduce setpoints during holds, resume with a short preventive purge before production |
| Intermittent streaks near one edge | Local die cold spot or contamination pocket | Lift local die temperature slightly within limits and perform a short chemical soak cycle |
| Specks after acetal jobs | Formaldehyde producing degradation and residue | Execute a chemical soak with robust LEV, then a neutral flush; review acetal handling guidance and air monitoring plan |
| New scratches after cleaning | Steel tools or abrasive media used | Stop, inspect for damage, switch to copper or brass tools, and assess wear before restart |
Program notes:
- For routine shutdowns, many plants use a heat stable sealing purge at the end of shift to minimize oxidation during cool down, consistent with Plastics Technology’s recommendations.
- Train operators on quick diagnostics so carbonized specks aren’t confused with unmelt or pigment agglomerates.
- Keep purging compound TDS and SDS accessible at the machine. Confirm the lower limit among resin, purging compound, and OEM specifications before setting temperatures.
References for deeper context
- Safety and servicing requirements are defined in OSHA 1910.147 Control of Hazardous Energy and the OSHA plastics machinery eTool. PPE and respirator program planning follow NIOSH’s respiratory protection toolkit.
- For staged purging practices and shutdown strategies, see Plastics Technology’s purging and shutdown practices.
- For neutral procedural insights on speed and pressure effects during mechanical purging, see Asaclean’s discussion of backpressure and screw speed.
- For visualizing safe hot cleaning steps and teardown choreography, see Davis Standard’s feedscrew cleaning tutorial.
- For acetal hazards and changeover cautions, review Celanese acetal processing guidance alongside your SDS.
A final planning note: Extruder screw cleaning works best when you treat it like a controlled experiment. State your hypothesis, set safe parameters, run the cycle, and check the result. If your acceptance isn’t met, escalate decisively rather than hoping a fourth identical pass will do the trick. That discipline is what keeps downtime short and quality high.
In my years on the factory floor, I’ve heard countless customers complain: “My machine is slowing down,” or “Why is my scrap rate suddenly spiking?”
Often, they blame the gearbox, the heater bands, or the raw material. But in my experience, the culprit is usually the one component that nobody wants to look at because it’s hidden inside the barrel: The Screw.
Theory is one thing, but data is another. Today, I want to share a real case study from a service call I made just last month. It’s a classic lesson in “penny wise, pound foolish,” and the data we collected proves exactly why screw maintenance is non-negotiable.
The Case Study: An Expensive Lesson in ABS Color Change
I’m the Lead Technician at BLOOM. Last month, a long-term client—a manufacturer of ABS automotive interior parts—called me in a panic.
The Background:
They were running a 75mm single-screw extruder. The machine had been running continuously for 6 months without pulling the screw. They received an urgent order requiring a switch from Black ABS to Beige ABS.
The Problem:
To save downtime, the operator attempted to “flush” the barrel by simply running the new beige material through.
The result? After 4 hours of flushing, the beige sheets were still showing intermittent “black specks” and streaks. Worse, the motor load (Amps) was pinning near the limit, yet the output was significantly lower than the machine’s rated capacity.
The Intervention:
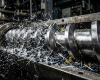
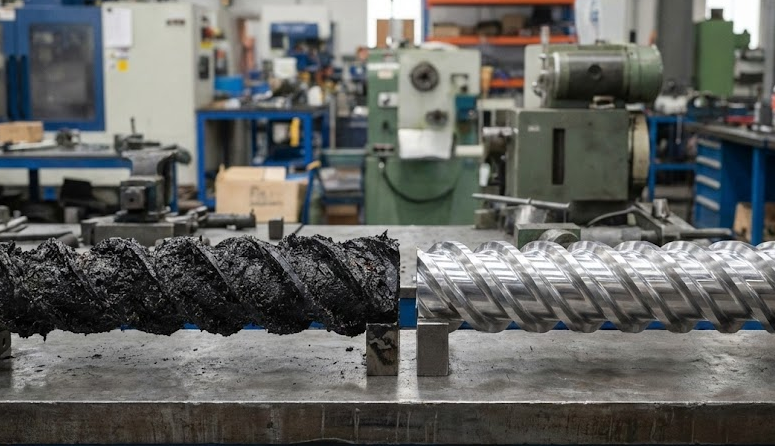
I arrived on-site and immediately ordered a shutdown. We pulled the screw.
The silence on the factory floor was telling. The screw’s Metering Zone and Compression Zone were coated in a hard, asphalt-like layer of carbonized plastic. The screw channels (flights), designed to be 4mm deep, effectively had less than 3mm of depth due to the buildup.
The Diagnosis: This carbon buildup was not only flaking off and contaminating the new beige material, but it was also altering the screw’s compression ratio, destroying its ability to convey material efficiently.
The Evidence: Performance Data (Before vs. After)
We spent 3 hours physically cleaning the screw using copper gauze and polishing paste until it was restored to its original chrome finish. We then reinstalled it and ran the exact same material.
The data speaks for itself:
| Parameter | Before Cleaning (Dirty Screw) | After Cleaning (Clean Screw) | Business Impact |
| Motor Load (Amps) | 85 A (High & Fluctuating) | 72 A (Stable) | Energy Costs Reduced by ~15% |
| Melt Pressure | 18 – 22 MPa (Surging) | 15 MPa (Stable) | Dimensional Stability Restored |
| Output Rate | 180 kg/h | 215 kg/h | Capacity Increased by 19.4% |
| Scrap Rate | 12% (Black specks) | < 1% | Quality Standard Met |
| Changeover Time | 4+ Hours (Failed) | 45 Minutes (Success) | Efficiency Increased 5x |
The Technical “Why”: Interpreting the Data
As a manufacturer, I believe it is crucial to understand the physics behind these numbers. Here is why a clean screw changes everything:
1. Why did the Amps drop? (Friction Reduction)
Carbon buildup is rough and porous. It creates immense friction against the polymer melt. The motor has to work significantly harder to push material over a rough surface than over a smooth, polished metal surface. Cleaning the screw reduced the shear heat and mechanical load instantly.
2. Why did the Pressure stabilize? (Flow Channel Consistency)
The data showed pressure jumping between 18 and 22 MPa before cleaning. This “surging” is caused by carbon narrowing the flow channels randomly (like a clogged artery). This leads to uneven wall thickness in the final product. Once cleaned, the flow channel geometry was restored, stabilizing the pressure.
3. Why did Output increase? (Restored Free Volume)
This is the metric that business owners care about most. The carbon layer was physically occupying space in the screw channel (Free Volume). By removing the carbon, we restored the screw’s volumetric capacity per revolution. You are no longer “extruding carbon”; you are extruding product.
Expert Advice: 3 Rules for Your Maintenance Team
Based on this case, here are three standard operating procedures (SOPs) I recommend you implement immediately:
- The “Pressure Delta” Rule:
Don’t wait for black specks to appear. Record the melt pressure of a clean screw at a specific RPM. When you see that pressure rise by 10-15% under the same conditions, it is time to pull and clean the screw. - Visual Management:
Take a picture of a dirty screw next to a clean one (like the image at the top of this article) and post it in the maintenance area. Make it clear to your team: This is the standard. - Don’t Rely Solely on Purging Compounds:
Chemical purging compounds are excellent for routine color changes, but they cannot remove hard, carbonized layers that have baked on for months. Periodic physical pulling and polishing is the only way to reset the machine’s “health.”
Conclusion
That day at the client’s factory, the production manager looked at the flawless beige sheet coming out of the die and said, “I thought we needed a new gearbox. I didn’t realize a bath was all it needed.”
A clean screw is not just about hygiene; it is about profitability.
If you are experiencing unexplained output drops or persistent contamination, it might be time to stop the line and check the heart of your machine.
Author: BLOOM. With over 15 years of experience in extruder design and process optimization, we help factories maximize their output. Contact us today to learn about our easy-clean, wear-resistant screw coatings.